 Step One

Before you get started, make sure that you feel comfortable working on your motorcycle and that you have a safe place for the bike to reside while the forks are off being serviced. We strongly recommend purchasing and using the appropriate front and rear stands for your motorcycle for optimum stability and safety.
However, removing the front forks is a surprisingly easy task. If you have the proper stands, most anybody should be capable of removing the forks in less than 30 minutes. Additionally, all forks are put on motorcycles the same basic way. We used a Kawasaki Z1000 for our test bike mostly because its lack of fairing added to the clarity of the photographs.
Take Note
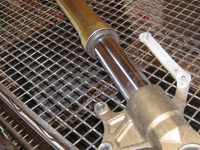
 Before you even get started, you need to take note of the height of the front of your bike. Measure the distance between the top of the upper triple-clamp and the top of the fork cap. In this image, the fork leg is about 1mm above the top of the triple clamp. Write down this measurement as it will be needed when you put the forks back on the motorcycle.
Once you have the front of the bike supported you will need to remove the front wheel. Loosen and remove the four bolts that hold the brake calipers in place, then just loosen the pinch bolts (our bike had only one pinch bolt) on the bottom front of the fork leg. Once the calipers are free from the rotors and the pinch bolts are loose, you can remove the wheel axle and the front wheel will drop down to the ground. Its a good idea to suspend your brake calipers with a short bungee cord so their weight isn't supported by just the brake lines.
Step Two
 With the wheel out of the way, remove the front fender. Most front fenders are held in place by four bolts that attach directly to the fork leg. The brake lines may be attached to the front fender with plastic or rubber clips. If they are, simply pinch them from the underside of the fender with a pair of pliers to release them from the fender. If you accidentally break the plastic guides, replacements can be found at your local dealership or an automotive body shop. Carefully remove the fender by pulling it forward out from between the fork legs. With the axle removed the bottoms of the fork legs will rotate which can provide additional clearance when removing some front fenders.
Step Three
 Now, four pinch bolts are all that will be holding each fork leg in place. Two bolts in the lower triple clamp and one to two bolts in the top triple clamp. All that's left to do is to loosen (but not remove) all of these pinch bolts. If your motorcycle has clipon style handlebars, the pinch bolts for the clipons will also need to be loosened.
Start from the top down. Loosen the highest pinch bolts (the top triple clamp) and work your way down to the clipons and finally the lower triple clamp. Once all the pinch bolts are loose, the fork will likely just slide out the bottom of the triple clamps, so be careful when you loosen the last bolt so the fork doesn't fall to the floor. If the forks do not slide out on their own, you may need to use a wide, flat headed screwdriver to open up the gap on the lower or upper triple clamp.
Reinstallation
 Simply reverse the steps outlined above. Be mindful when you tighten up the two pinch bolts for each triple-clap, to only turn each bolt one-half turn, alternating between bolts so you don't twist or deform the aluminum. Also, never over tighten the pinch bolts. Refer to your owners manual for the proper bolt torque specifications.
When replacing the front wheel, first insert the axle and just hand-tighten it, then finger-tighten the axle pinch bolts. Put the motorcycle back on the ground and bounce on the forks several times to ensure proper axle alignment. After a few bounces, properly torque down the axle and the axle pinch bolts.